Tutorials
Explore tutorials for help using the PaymentsPlus REST API.
On this page you will find tutorials to help with common scenarios:
- Uploading a payment file.
- Making a payment.
- Finding pending payments.
- Find recently returned payments.
- Determine the types of payments you can make with your settlement accounts.
You'll also find tutorials to:
- explore the API using Postman,
- use curl to check for network connectivity, and
- help with troubleshooting.
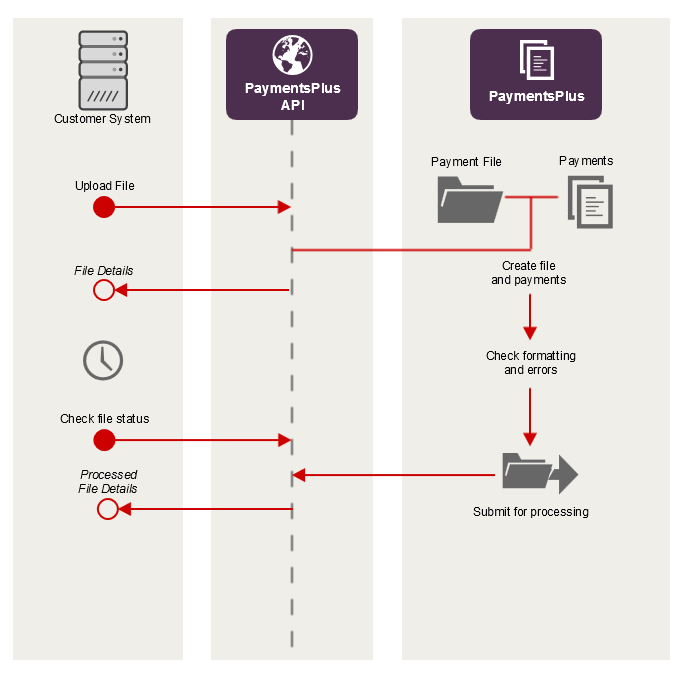
Uploading a bulk payment file
Scenario: we want to upload a bulk payment file for processing.
- The Upload File Payment API is used to submit the encoded file contents.
- The REST API response with the details of the uploaded file.
- If correct, the file will be submitted for processing automatically.
- The Get Payments in a File API can be used to check the individual payments in the file.
- The REST API responds with the details of the payments.
- The Get File API can be used to check the status of the file.
- The REST API responds with the status of the file, indicating when it has been processed.
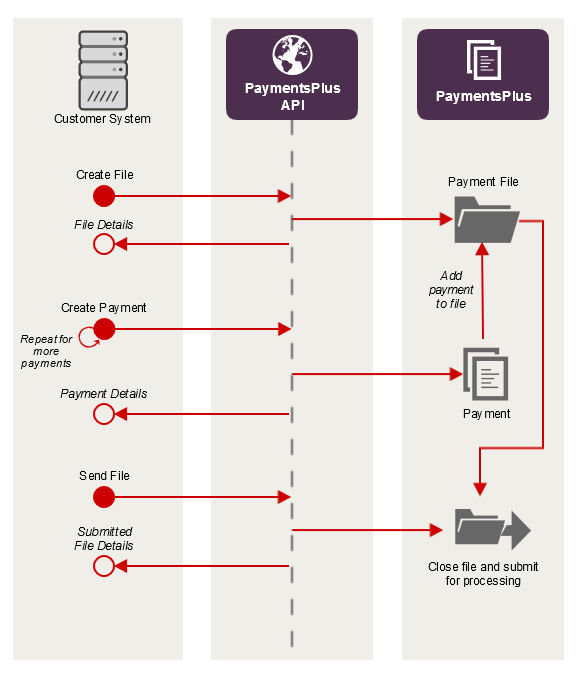
Making a payment
Scenario: we want to create a single AU Direct Entry (EFT) payment.
- The Create File API is used to create an OPEN file for the payment to be added to.
- The REST API responds with the details of the file created.
- The Create Payment API is used to create the payment.
- The REST API responds with the details of the payment.
- The Create Payment API can be called more times to add more payments.
- The REST API adds these payments to the file created in Step 1.
- The Send File API is used to mark the file as complete and submit if for processing.
- The REST API responds with the updated status of the file.
- The Get Payment API is used to check the status of individual payments.
- The REST API responds with the details and status of the payment.
Checking the status of a file
Scenario: we want to find out the status of a file we have submitted.
- The Get File API can be used to check the status of the file.
- The REST API responds with the details and status of the file.
- See File status codes for details.
Checking the status of payments
Scenario: we want to find out the status of a payments we have submitted for processing.
- The Get File API can be used to check the status of the file.
- The REST API responds with the details and status of the file.
- See File status codes for details.
- If the file is in a PROCESSING state, then the Get Payment API is used to check the status of individual payments.
- The REST API responds with the details and status of the payment.
- See Payment status codes for details.
Finding currently pending payments
Scenario: we want to see what payments are currently pending, i.e. payments that have not settled yet.
- The List Pending Payments API is used to query for pending payments.
- The REST API responds with a list of all currently pending payments.
Find recently returned payments
Scenario: we want to see the payments that have been returned in the last 48 hours.
- The List Returned Payments API is used to query for returned payments.
- The REST API responds with a list of the payments returned in the last 48 hours.
Finding all payments for a particular date
Scenario: we want to find all payments for a particular date, regardless of what files they were a part of.
- The List By Date API is used to list the payments for a specified date.
- The REST API responds with a list of payments for that date.
Finding the kinds of payments that can be made
- The Get Available Methods API is used to query what Payment Instruments can be used by the facility.
- The REST API responds with a list of the payment instruments available and which accounts can be used for those instruments.
Finding the accounts that can be used to make payments
Scenario: we want to make a payment for a particular payment instrument and want to know what accounts can be used as the funding account.
- The Get Accounts API is used to list the accounts available to the facility.
- The REST API responds with a list of accounts that can be used and which instruments they can be used for.
Explore the API using Postman
Postman is a HTTP client for testing RESTful web services. Use Postman when you wish to explore the PaymentsPlus REST API.
Note: If you choose to use Postman you should follow the security best practices as per the Postman documentation
Step 1: Install Postman
- Install Postman for Windows/MacOS/Linux.
Step 2: Use API key for Basic Auth
- Start Postman.
- Click the Authorization tab.
- Select Basic Auth from the menu.
- Enter your API key into the Username field.
- Press Update request (later version of Postman may update automatically)
Step 3: Explore the API from the Root resource
- In Postman's URL bar, select GET.
- Enter the URL
https://api.paymentsplus.westpac.com.au/rest/v1. - Press Send.
- Click links in the response to open them in a new tab in Postman. Use Postman to send requests to these resources.
Step 4: Sending content in the body
- Click on the Body tab, and choose the "raw" radio option, then change the dropdown from "Text" to "JSON (application/json)".
- Enter the JSON data for the request.
Use curl to check network
For your software to work, your server must be able to connect to PaymentsPlus. Follow these details to determine if there is a problem with your network or your software.
Step 1: Download and Install curl
Download and install the curl client for your platform from http://curl.haxx.se/download.html. Be sure to download the correct distribution for your server's operating system. You must download a version that includes SSL support.
If you are using Windows, we recommend that you download the binary distribution listed under the heading Win32 - Generic labelled Win32 2000/XP, binary and SSL and maintained by Gunter Knauf. This document does not provide a direct link because you should always download the latest version.
Step 2: Get the Root resource for the API
To test if your server can connect to PaymentsPlus:
curl -i --basic --user "{ApiKey}:" {baseURL}Replace {ApiKey} with your API Key. Replace {baseURL} with the Base URL for the environment you're working in.
Troubleshooting
HTTP status codes other than 200
See: HTTP Status Codes.
curl: (60) SSL Certificate Problem: Unable to get local issuer certificate
Your server does not trust the server TLS certificate presented by PaymentsPlus. Typically this is due to an out-dated root CA certificate bundle on your server. Download and install an updated VeriSign Class 3 Primary CA - G5 root certificate for your server.
curl: (56) Received HTTP code 407 from proxy after connects
Your network has a proxy server. To test if your server can connect to PaymentsPlus through the proxy server:
curl --proxy {proxyServer} --proxy-user {proxyUsernamePassword} -i --basic --user "{ApiKey}:" {baseURL}Your software must connect to PaymentsPlus through the proxy server.
curl: (6) Couldn't resolve host
The message may reference any of the Base URLs.
DNS resolution failed. You may need to authenticate with your proxy server.
Using curl to upload a payment file
Use this tutorial to upload a payment file. Complete the curl network connectivity tutorial first to ensure curl can connect to PaymentsPlus.
Step 1: Generate a payment file
Your software must generate a file in one of the payment file formats. Each file must have a unique code.
In this tutorial, we assume the file is called example.csv.
Step 2: Save API key to file
-
Enter the following into a text file:
curl basic user={ApiKey}: silent show-error fail -
Replace
{ApiKey}with your API Key. -
Save the file as
paymentsplus-curl-config.txt.
Step 3: Upload a payment file
To upload a payment file:
curl --config paymentsplus-curl-config.txt -F "file=@example.csv" {baseURL}/files/{fileReferenceCode}/uploadReplace {baseURL} with the Base URL for the environment you're working in.
Step 4: Improve your solution
You may now improve your solution by:
- Logging errors
- Automating the process by creating a scheduled task. Refer to your operating system's documentation.
- Polling the status of your file.
- Downloading errors in your file and reporting them to staff.
Using Postman to upload a payment file
Download the Postman application: https://www.getpostman.com/.
Postman should only be used to basic testing and should never be used in a production environment.
Future versions of the Postman application may look or behave differently than the examples below.
Step 1: Generate a payment file
Your software must generate a file in one of the payment file formats. Each file must have a unique code.
Step 2: Set the authorisation
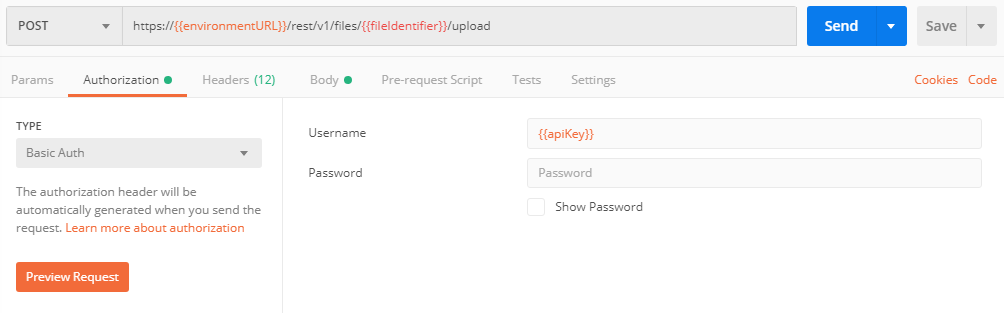
- Under the Authorization tab, select Basic Auth.
- Copy your API key and paste the value into the Username field. Leave Password blank.
Step 3: Set the request headers
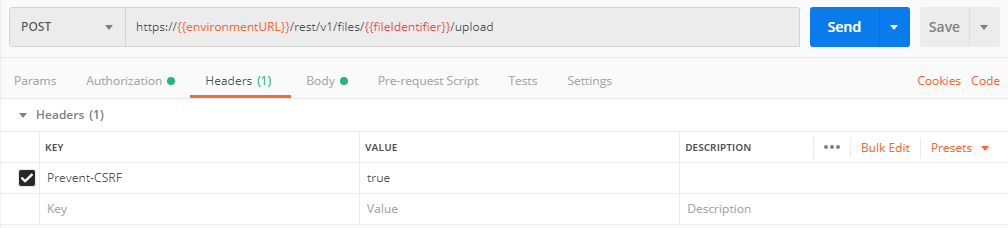
- Under the Headers tab, add a new parameter called
Prevent-CSRFwith a value oftrue.
Step 4: Set the request body

- Under the Body tab, select the type of
form-data. - Add a new field with a key
file, select the type of this field asfile(just to the right of the key). - For the value of the field, select the test file you created in step 1.
Step 5: Submit the file
- Set the
{{environmentURL}}to be the URL of the test environment. - Set the
{{fileIdentifier}}to be a unique value to identify your test file. - Submit the request.
Further information
For further information on the responses or any possible errors, see the file API.