User guide
PaymentsPlus is an automated system which takes care of costly and time consuming processes experienced by businesses involved with payables processing. This guide will help you find the answers to some of the most commonly asked questions when using PaymentsPlus.
Navigation
This section describes the basic layout of PaymentsPlus.
Click Sign in at the top right and enter your login name and password. The first time you sign in you will be asked to:
- Change the password. It is case-sensitive. Choose a strong password and keep it secure.
- Accept the Terms of Use.
On sign in, the Home tab displays the Dashboard showing the status of recent transactions.
There are 3 panels:
- Payment History panel showing the progress of payments being made. Click a link in the Buyer Reference column to find out more details about a transaction.
- Recent Settlements. Click a link in the Settlement Date column to find out more details about a payment.
- Recent Audit History panel showing what actions have been carried out by your Users.
The other tabs:
- Payments - Contains pages related to viewing and searching for payments.
- My Info - Used to update your details.
- Reports - Contains reports related to your facility.
- Administration - Contains pages for administering your facility and users.
Access Rights
| Access Right | Enabled Abilities |
|---|---|
| Upload File | * Upload payment file * Download the uploaded file * View payment data * Extract payment data * Westpac Verify |
| Authorise File | * Authorise payment file * Cancel payment file (which are pending authorisation) * View payment data * Extract payment data * Westpac Verify |
| Send Supplier Invites | * Send payees invite to the Payee Portal * Bulk send invites * Westpac Verify |
| Administrator | * View and access payment data * Access to administrator actions and view including audit history, login history, user details and their access, business details, settlement accounts, preferences * Westpac Verify |
| View Portal Data | * View payment data through the Dashboard, payment history, search functionality, etc. * Extract payment data * Westpac Verify |
| Westpac Verify Only | * Westpac Verify |
Payments
The Payments tab is where you find information about payments, files and other reports.
See also:
Uploading a payment file
This procedure explains how to upload a list of payments to be made to you Recipients, staff and others.
When you click on the Payments tabs, it defaults to the Recent Uploads page.
- Select Payments > Upload File.
- Choose a file on your computer and click Upload.
- The File Details page opens to show you the status of the file processing.
- Once the processing of the file completes, you are shown the Recent Uploads page showing the file as Authorisation Required.
How long will it take to upload the file?
This will depend on the speed of your internet connection. It will also depend on the size of the file you are uploading and whether the system is busy uploading other files. The page will reload automatically, so you do not need to refresh your browser window manually. We recommend that you wait for 30 minutes for your file to upload before contacting the help desk.
Can I continue to use the site whilst the file is uploading?
You can continue using this site while the system is uploading your file. If you want to return to check the status of the upload, select the Recent Uploads menu item. The status on the page will read "Checking Format" to indicate the file is being uploaded. Once the file is uploaded, the status will change to "Pending", "Authorisation Required" or "File Format Error".
What do I do after I have uploaded a file?
You should check that the transactions in the file you uploaded are correct and authorise the file for processing.
Viewing recent uploads
This procedure explains how to view recently uploaded payment files and details of the payments made within each one.
- Select Payments and Recent Uploads.
- Click the underlined file name that you want to view.
- The File Details page opens showing a Summary of the file selected.
- Select the Payments tab to view the payment details.
Viewing payment history
This procedure explains how to view the history of the payments made.
They are listed in date order by the name of the payment file loaded from your business system.
- Select Payments > Payment History.
- The Payment History page opens. This page shows the history of payments made.
- Click the file name in the Buyer Reference column.
- The Payment History Detail page displays a summary of payments made.
- To view Payment Details of a payment made, click the underlined linked file name in the Recipient Reference column of the Recipient Payments panel.
- The Payment Details page opens. From this page you can:
- Download the Remittance Advice PDF.
- Export the Remittance Advice as a CSV
- Click the History tab to view the audit trail.
Viewing pending payments
This procedure explains how to view pending payments.
- Select Payments > Pending Payments.
- The Pending Payments page opens.
- This page shows you a list of payments pending. Click on the File Name of the file you want to view in the Pending Payments panel.
- Click on the link in the Recipient Reference column.
- The Payment Details page opens showing schedule information about the payment pending.
Search for a payment
This procedure explains how to search for a payment.
- Select Payments > Search Payments.
- The Search Payments page opens.
- Enter the search criteria into the various fields. Click the Search button.
- The Search Payments page displays payments that meet the search criteria.
- Locate the payment and click the file name in the Payee Reference column to view its details.
Payment status icons
Icons are used in PaymentsPlus to allow you to quickly identify the status of a payment.
| Icon | Meaning |
|---|---|
| Payment successfully completed | |
| Payment successfully completed with possibly failed payments. A number will indicate the amount of failed payments in the batch e.g. 7 |
|
| Payment failed | |
| Payment is being processed | |
| Payment is scheduled to be paid | |
| Payment is currently on hold | |
| Payment requires authorisation |
Stopping payment on a cheque
This procedure explains how to raise a stop payment request on a cheque. Requires the Payment Maintenance right. Please note: if a cheque is already presented, the request may not succeed.
- Select Payments > Payments History.
- Click the link of a Cheque Debit to be stopped.
- The Payment History Detail page displays the details of the payment.
- Click the link in the Payee Reference column of the payment you want to stop.
- The Payment Details page opens.
- Click the Stop Cheque button.
- The Confirm Stop Cheque page opens.
- Click the Stop Cheque button again to confirm. The Payment Details page opens showing that a stop is requested on the cheque.
Checking for daily settlements
This procedure explains how to access the information that will appear on your bank statement that identifies the payments made by PaymentsPlus.
- Select Payments > Daily Settlement.
- The Daily Settlement page opens.
- Enter the date into the Settlement Date field.
- Click the Display button.
If required, you can export the payments to a CSV. Click the *Export All Payments button.
Westpac Verify with Confirmation of Payee (CoP)
This procedure explains how to verify a payee’s account details before sending them a payment.
What is Westpac Verify with Confirmation of Payee (CoP)?
Westpac Verify with CoP helps you to make informed decisions by adding an extra layer of protection every time you add a new payee.
This helps reduce the risk of making a payment to the wrong account, and protect you from scams such as Payment Redirection or Business Email Compromise scams.
How it works?
We complete our check automatically by reviewing account details, in real time, through two ways:
- Confirmation of Payee We'll check if the account details entered by a payer (account name, BSB, and account number) matches the details held by the recipient's bank, and;
- Westpac Verify We'll check our previous payment data to see if the details (account name, BSB, and account number) have been commonly used by other Westpac customers.
We'll share the match outcome with you (where available) before you make the payment.
How is Westpac Verify charged?
Westpac Verify with CoP is free of charge for singular manual look-ups.
Westpac Verify with CoP is available for Bulk Upload and/or the PaymentsPlus API as a chargeable add-on service. For the Bulk Upload or API iterations, a payee check fee is charged for each individual payee included in an uploaded file/API call. Any “rechecks” will be considered a new request and incur a payee check fee each. The relevant fee for this service is detailed in the Pricing Agreement (provided to you if you enable this add-on) using the fee code/name “AK2ADFEE Additional Services”. Please contact your relationship manager or client enquiry manager for more information on how to activate this.
How to use Westpac Verify with CoP in PaymentsPlus?
- Select Payments > Westpac Verify with Confirmation of Payee for PaymentsPlus.
- Complete a:
- Singular look-ups by inputting the BSB and Account Number of the account for verification along with the Payee account name that is believed to be associated with the account
- Bulk Upload by pressing upload and choosing a file to be loaded
- Click Verify
- Obtain a response
Refer to the following for details on how to use Westpac Verify using a PaymentsPlus API and file format.
What to expect?
After you perform a Westpac Verify with CoP check, we'll explain the match outcome. If we alert you to a mismatch, consider performing our recommended steps set out below.
What responses might I see?
- The details you’ve entered match the account details held by the receiving financial institution, and/or the details have been commonly used by other Westpac customers.
- The details you've entered don't match the account details held by the receiving financial institution. We also haven’t seen this account name used by other Westpac customers before to pay this BSB and account number. Call the payee to confirm the details or check you've not entered account details incorrectly.
- The details you’ve entered match the account details held by the receiving financial institution, but we haven’t seen many payments made by other Westpac customers to this account.
- We’re unable to check the account details right now. Try again later, or verbally check with the payee to be scam aware and to avoid mistaken payments.
Recommended steps if the account details don’t match:
- Check the BSB and account number and the spelling of the account name.
- Call the payee directly to check their bank account details.
- Remember: Account names are not used to process payments. If you send money to the wrong account, we may not be able to recover your funds.
FAQ:
What happens if I don’t use the correct name?
Commonly shortened names, e.g., Chris or Ben, will be taken into consideration when providing you an outcome.
Westpac Verify with CoP:
- checks if the account details entered by a payer (account name, BSB and account number) matches the details held by the recipient's bank, and
- checks our previous payment data to see if the account details (account name, BSB, and account number) have been commonly used by other Westpac customers. Where available, we’ll let you know if the account details you've entered (account name, BSB, and account number) matches the details held by the recipient's financial institution or matches the details commonly used by other Westpac customers in previous payments data. We'll also let you know if we experience issues checking the bank records.
Why would the payee business name, trading name or trust return a no-match result?
Westpac Verify with CoP checks the account name. Sometimes, the payee may go by a different name, or use a different name for the account (e.g. your business trades under a different name or your account is held in trust). If you've spoken directly with the account holder and confirmed the payment details are correct, this should give you added confidence.
For joint accounts, whose name will be displayed?
Only the name(s) entered that are a match or close match (on a joint account) will be shown. Any account names that are not entered in the look-up will not be displayed for privacy protection.
Note:
Westpac Verify with Confirmation of Payee screening is based on the payment information available at the time you enter your payee details. It may be affected by such things as system outages or limitations, scheduled maintenance or other factors beyond our control, and may not be available at all times.
Email remittances
Payment Remittances can be downloaded through the portal and secure links are emailed to your customers. See Accessing your email remittances for your customers.
Sending remittances
Remittances are sent to customers as part of the payment process when email delivery is specified.
The customer will be sent a secure email link to download the remittance from the PaymentsPlus website.
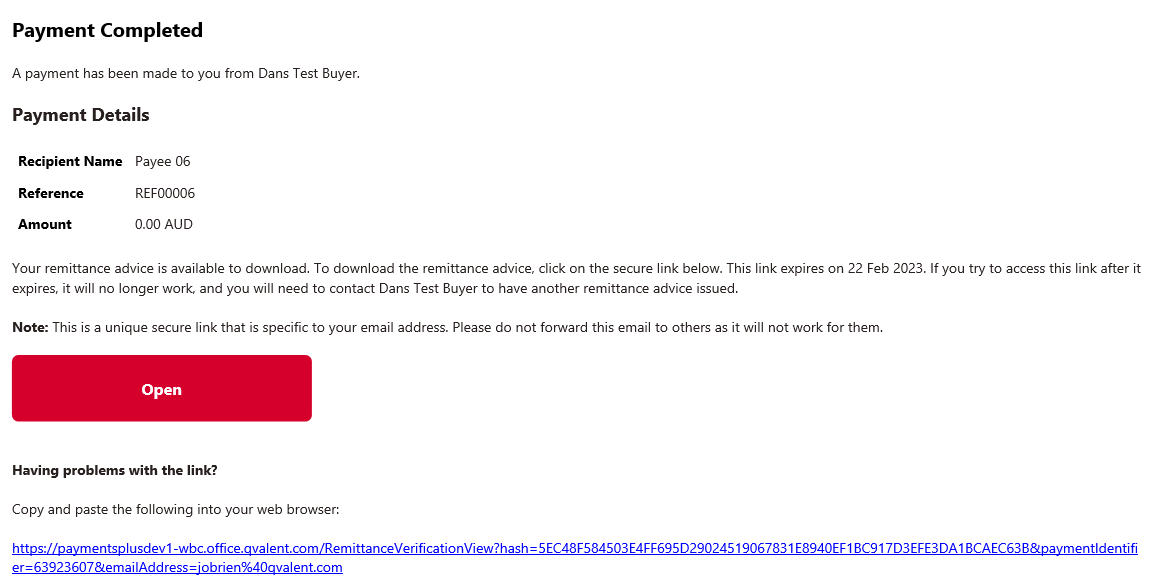
Remittance email
Your customer will receive an email from PaymentsPlus providing them a secure link to access the remittance file for the payment.
The email link will remain valid for 90 days after which you will need to resend the remittance link to them via the PaymentsPlus portal.
Below is a sample of the email content.
Remittance link verification
When the customer clicks the link they are directed to the PaymentsPlus website and will pass a reCaptcha check to continue.
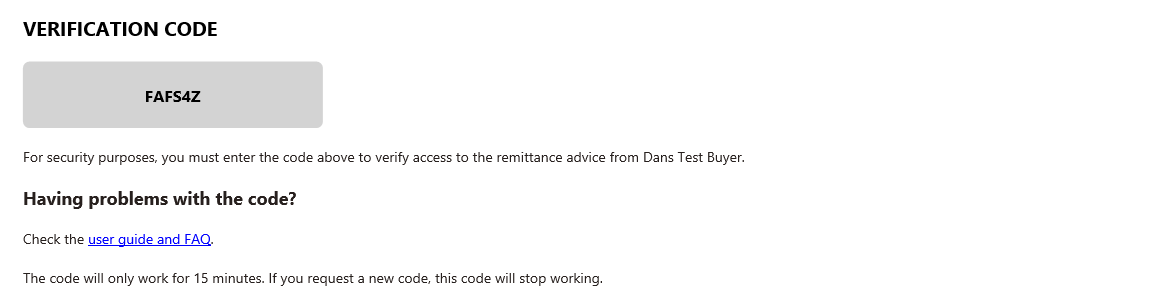
One-time code
The customer is then sent a one time code to access the download. This code lasts for 15 minutes after which they will have to click the email link and pass the reCaptcha again.
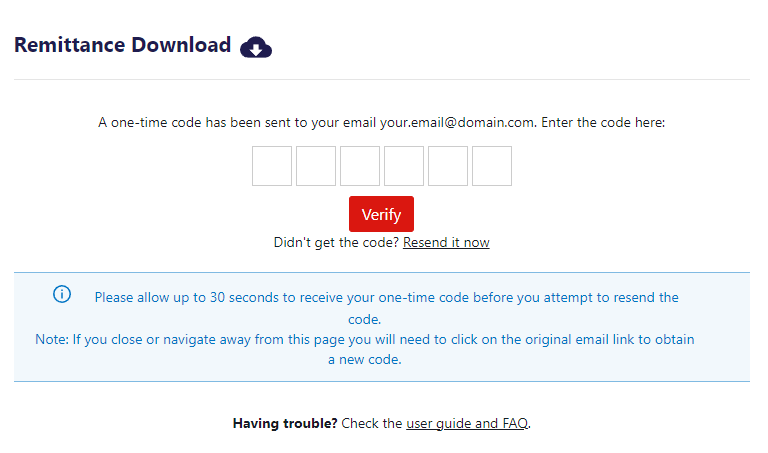
If the customer does not receive the code they can resend it using the link on the screen.
Below is a sample of the email content they will receive.
Remittance access and download
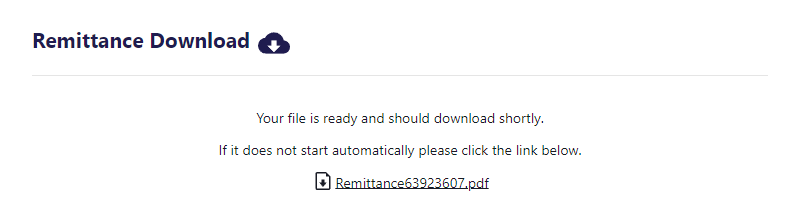
Once the customer has completed the above steps, they will be provided the download link. The download will also start automatically in the browser. Within this link, they will also have access to a screen displayed with remittances sent to their email address across buyers for the last 365 days. Within this page, your recipient can:
- View the remittances sent by payer, month, amount and/or reference fields
- Download historical remittances in PDF or CSV format
- Select multiple remittances to download in bulk
- Generate a share link to allow another user to access to this page
- Invalidate share links to allow another user to access to this page
Reissuing a remittance
If a customer needs the secure email link resent to them this can be performed by logging into the PaymentsPlus portal and using the "Resend Remittance" functionality.
To do this perform the following steps:
-
Login to the PaymentsPlus portal by clicking "Sign In" in the top right of this screen.
-
Search for the appropriate payment.
-
Select Payments > Search Payments.
-
The Search Payments page opens.
-
Enter the search criteria into the various fields. Click the Search button.
-
The Search Payments page displays payments that meet the search criteria.
-
Locate the payment and click the file name in the Payee Reference column to view its details.
-
When viewing the payment click the "Resend Remittance Advice" button as shown below.
-
You will be prompted to enter an email address to send this to. This will default to the address it was originally sent to. You can replace this with a different email address.
Administration
The Administration tab allows you to manage users, your facility, and security configuration.
Changing your details
This procedure explains how to change your own details.
- Select My Info > Details and Preferences.
- The Profile page appears.
- Click Edit Preferences and update as needed, or click Edit Personal Details to go to the accounts page to change your personal information.
Changing your password
- Select My Info > Details and Preferences.
- The Profile page appears.
- Click Edit Personal Details to go to the accounts page and change your password.
The page will display Update successful when the password is changed.
Security questions
In order for us to maintain a high level of security, we ask that you select two questions and enter appropriate answers below. The questions and answers will be recorded and may be used when we receive a request for information regarding your account. For example, a request for a password reset.
Do I have to select and answer the questions?
Yes. As this is a security feature applied to all clients, it is important that all clients provide this information. You will not be able to complete the login process until this step is completed.
Why is this necessary?
This security feature has been implemented to help protect your account and allow for improved identification of unauthorised requests.
When will the security questions be used?
Your security question/answers will only be used if you have forgotten your password or call our help desk. We will never send an email to you requesting you to supply these details. If you ever receive such an email, please report this to our help desk immediately.
What about my password?
The answering of these security questions will not affect your password. Once you have selected and answered the questions, the next time you attempt to login you will need to enter the User Name and Password that you normally use and you will be logged on as per usual. The Security Questions screen will not be displayed.
View the audit history
This procedure explains how to view events in PaymentsPlus.
- Select the Administration tab.
- The Audit History page opens. This is the default page. The page lists every event in date order starting from the most recent date.
To access the User details, click the name in the User column.
View login history
This procedure explains how to view the login history of a User.
- Select Administration > Login History.
- The Search Login History page opens.
- Enter the User's Login Name and dates you want to search.
- Click Search.
- The Login History page opens.
To access the User details, click the name in the User column.
Create a user
Select Administration > Users.
To create the new user, click the Create New User button.
Complete the details as follows for the user:
- Enter the login name and Full name.
- Enter the contact details such as the email address, phone and mobile.
- Select the tasks that will be performed.
- Enter their existing Westpac/St. George Customer Number (if already a customer).
- Enter their date of birth.
- Complete the mandatory declaration.
- Enter your Password for security.
- Click Save request.
PaymentsPlus will set the new user details to a Pending IDV status. The summary of the new user access is displayed. Once the identification and verification checks are complete, the user will receive an email to register for PaymentsPlus.
See Manage Pending User Access Requests for information on requests.
See Accounts User Guide for information on registering an account.
Editing a user's details
From time to time, you may need to change a User's details or access.
Follow these steps:
- Select the tasks that will be performed.
- Enter their existing Westpac/St. George Customer Number (if already a customer).
- Enter their date of birth (if not already populated).
- Complete the mandatory declaration.
- Enter your Password for security.
- Click Save request.
PaymentsPlus will set the updated user details to a Pending IDV status if you modify the users identification information or add additional tasks. The summary of the new user access is displayed. Once the identification and verification checks are complete, the status is changed to enabled.
Resetting a user's password
For security reasons you cannot reset a password on behalf of a user. Users can proceed to the Facility Portal login and reset their own password via that page
For more information see: Accounts User Guide
Disabling a user
This procedure explains how to stop a User's access to PaymentsPlus.
- Select Administration > Users.
- The Users page opens.
- Click the Login Name of the user details you want to change. You can use the search box to find a user by Login Name or Full Name.
- The User Details page opens.
- Click the Disable button.
- The Disable User page opens.
- Add reason for disabling.
- Enter your Password for security.
- Click the Disable User button.
The User Details page opens displaying that the Status has changed.
Please note, the system automatically locks out and consequently disables any dormant user accounts after periods of inactivity.
This applies as following:
- Dormant account lockout: 180 days
- Dormant account disablement: 540 days
Manage Pending User Access Requests
Click Pending User Access Requests in the Administration menu.
A User Access Request is a request made by the Company Administrator to create a new user, or to modify access for an existing user in your company.
A User Access Request can be in one of six statuses:
- Auth required - Another Company Administrator user must sign in to PaymentsPlus and approve this request. This is required when Single or Dual User Authorisation is set for users in your company.
- Pending IDV - The request is pending identification and verification with the bank.
- Declined IDV - The request was declined by the bank because it did not pass identification and verification checks.
- Invite sent - The user has been approved and an invite has been sent to their email address.
- Invite expired - The user was sent an invite but it wasn't actioned before its expiry. View the access request to resend the invite to the user as required.
- Invalid invite - The user could not be invited because they have an existing user account which didn't match the details of the new one. Edit the invite to change their Username and/or Email address and resend their invite.
Any requests you make can be rejected if you have made a mistake.
View User Access Request history
Click User Access Request History in the Administration menu.
The history of User Access Requests is listed on this page. You may view the Access Request history for existing users by viewing their details.
Updating your business details
The procedure explains how to update details about your business.
- Select Administration > Business Details.
- Update your Business Details and click Save.
View account details
Select Administration > Settlement Accounts.
Update your remittance email delivery
- From the Preferences page, click General
- Select between two options:
- Send one email per remittance where payees will receive one email for each remittance sent or
- Send one email per day where payees will receive a singular email consolidating all remittances sent each day
- Click Save
Update your time zone
- From the Preferences page, click General.
- Select your Time Zone and click Save to display dates and times in your preferred time zone.
Modifying the format of your remittance advice
This procedure explains how to modify the layout and format of the remittance advice sent to your recipients.
- From the Preferences page, click Remittance Format.
- Choose the layout to be edited and click the Edit button on the bottom right.
- Follow the prompts in Layout Identifier to name the layout being edited, Company Information to edit the company name and email address to be referenced in the body of the email itself, Address Details and Layout Header to add unique details in the remittance document and click Next
- Follow the prompts in Remittance Messages, Available Columns and Column Order to edit your preferred layout. You can add or remove columns based on the level of detail required on your email remittance advice and customise a label for each column. Click Next once complete.
- Follow the prompt in Colour scheme to select the colouring for your remittance advice and click Save.
- Choose the Add or Remove buttons to create more remittance layouts and delete versions that are no longer required.
- Choose the Default button to select one of the created layouts as the default version.
Setting email recipients for facility emails
- From the Preferences page, click Facility Emails
- From this page, you can add additional emails to receive this facility’s file status emails. A comma separated list of recipients can be added here.
- Click Save
Change your payment export type
This procedure explains how to change the payment export type.
- From the Preferences page, click Payment Export Type.
- The Payment Export Type page opens.
- From this page you can change the format of your payment export.
Setting the authorisation level for payments
Please contact your Westpac relationship contact to modify or amend the authorisation level for payments.
Setting the authorisation level for users
Please contact your Westpac relationship contact to modify or amend the authorisation level for users.